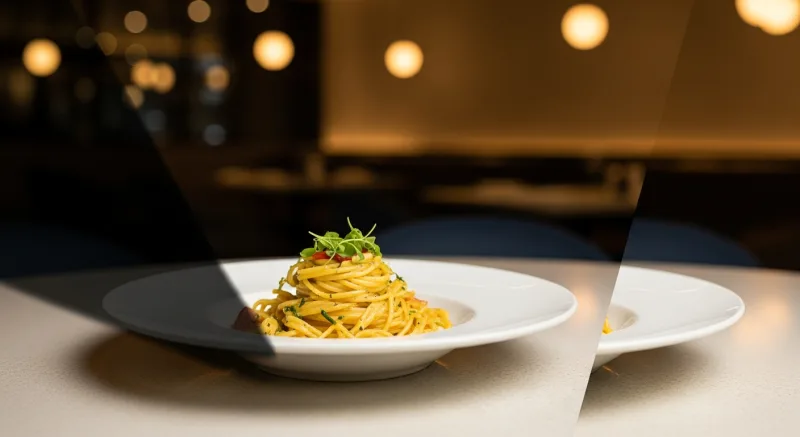
In the restaurant business, customers eat with their eyes first. A study by MGH found that 45% of diners in the U.S. tried a restaurant for the first time based on a social media post, and menus with high-quality food photos can increase sales of photographed items by up to 30%. The problem? Professional food photography shoots cost anywhere from $500 to $5,000 per session, putting polished imagery out of reach for most independent restaurant owners.
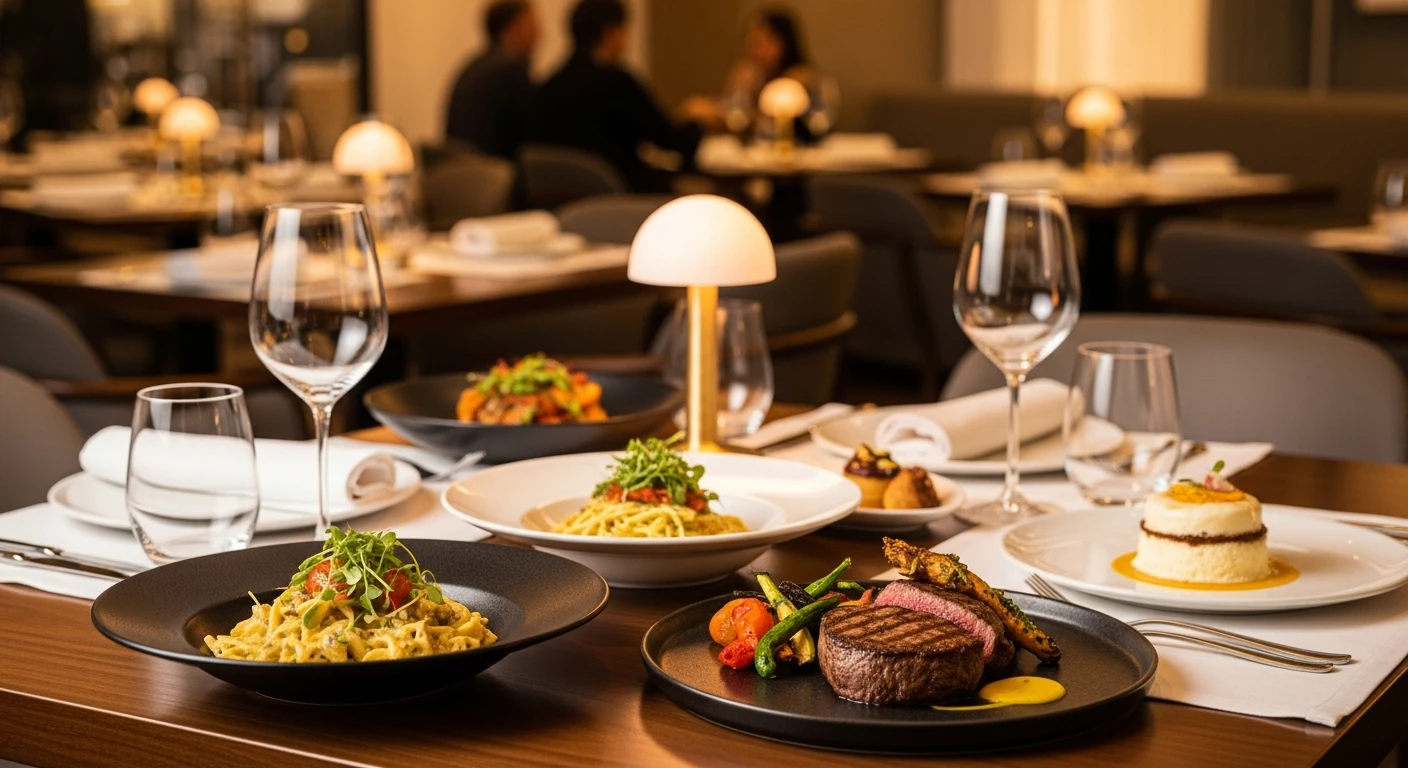
Professional food photography enhances your menu and online presence
The good news: modern smartphones have cameras powerful enough to capture genuinely stunning food photos. Combined with the right technique and smart editing tools, you can create menu-worthy images without hiring a photographer or renting a studio. This guide walks you through everything you need to know, from setting up your shot to publishing a finished photo that makes customers hungry.
Why Food Photography Matters for Your Restaurant
Before diving into technique, it helps to understand exactly how much food photography impacts your bottom line.
- Online ordering conversion: Menus with photos generate 25-35% more online orders than text-only menus, according to multiple ordering platform studies. When customers can see what they are ordering, they order more confidently and add more items.
- Social media engagement: Food is one of the most-shared categories on Instagram, TikTok, and Facebook. Restaurants that post quality food photos consistently see 2-3x more engagement than those posting only promotions or text updates.
- Google Business Profile clicks: Restaurants with 10+ quality photos on their Google Business Profile receive 35% more click-throughs to their website and 42% more requests for driving directions, per Google's own data.
- Menu upselling: Featuring photos of higher-margin items (appetizers, desserts, specialty cocktails) on your digital menu boards or printed menus draws attention to those items and increases their order frequency.
In short, better food photos lead directly to more customers and higher average checks. The investment of time to learn basic photography skills pays for itself many times over.
Essential Equipment: What You Already Have
You do not need a DSLR camera to get great results. Here is the minimal setup that works for most restaurant owners:
- A modern smartphone: Any iPhone 12 or newer, Samsung Galaxy S21 or newer, or Google Pixel 6 or newer will produce excellent results. These phones have multiple lenses, computational photography, and enough resolution for any digital or print use.
- A tripod or phone mount: A basic smartphone tripod ($15-30) eliminates camera shake and lets you take consistent, sharp images. Look for one with a flexible neck or adjustable arm for overhead shots.
- A white foam board or two: Available at any dollar store for $1-2 each. These serve as light reflectors to fill in shadows, and they make the single biggest difference in amateur food photography.
- A clean cloth napkin or linen: Useful as a background or styling prop. Stick to neutral tones: white, light gray, or natural linen.
That is it. Total investment beyond your phone: under $50. Everything else comes down to technique.
Lighting: The Single Most Important Factor
Lighting makes or breaks a food photo. The difference between a professional-looking image and an amateur snapshot almost always comes down to light quality and direction. Here is how to get it right.
Use Natural Light Whenever Possible
Natural window light is the most flattering light source for food. It is soft, directional, and free. To use it effectively:
- Set up your shooting area near a large window that does not receive direct sunlight. North-facing windows are ideal because they provide consistent, diffused light throughout the day.
- If your window gets direct sun, hang a white bed sheet or sheer curtain over it to diffuse the light and eliminate harsh shadows.
- Shoot during midday when light is strongest. Early morning or late afternoon light can create a warm, golden cast that works beautifully for some dishes but makes others look yellow.
Position Light to the Side or Behind
The direction of light relative to your food matters enormously:
- Side lighting (light comes from the left or right): This is the most versatile and forgiving angle. It creates gentle shadows that give food dimension and texture without being overly dramatic. Start here for most dishes.
- Backlighting (light comes from behind the food, toward the camera): This creates a beautiful glow around the edges of food and is especially stunning for drinks, soups, and dishes with steam. Use a white foam board in front (camera side) to bounce some light back onto the front of the dish.
- Front lighting (light comes from behind the camera): Avoid this. It flattens the food and eliminates shadows, making everything look two-dimensional and unappetizing. This is why on-camera flash almost always looks terrible for food.
The Foam Board Bounce Technique
This is the single most impactful trick in amateur food photography. When you light from the side, one side of your dish will have nice highlights and the other will fall into shadow. To fix this:
- Position your food near the window with light coming from one side.
- Place a white foam board on the opposite side of the food from the window, standing upright.
- The foam board bounces window light back onto the shadowed side, filling in the shadows and creating even, flattering illumination.
- Move the foam board closer for more fill (flatter light) or further away for more contrast (moodier light).
Pro tip: If you need to shoot during evening service when natural light is not available, invest in a single LED panel light ($40-80) with adjustable color temperature. Set it to around 5000K (daylight), position it to the side of your food at a 45-degree angle, and diffuse it with a sheet of parchment paper or a white napkin held about 12 inches in front of the light.
Composition: Arranging the Shot
Once your lighting is set, the way you arrange elements in the frame determines whether the photo looks intentional and appetizing or cluttered and confusing.
Choose the Right Angle
Different dishes look best from different angles:
| Angle | Best For | Examples |
|---|---|---|
| Overhead (90°) | Flat dishes, bowls, spreads, platters | Pizza, poke bowls, charcuterie boards, salads |
| 45-degree angle | Most dishes; the natural dining perspective | Pasta, entrees, sandwiches, desserts |
| Straight on (0°) | Tall items with layers or height | Burgers, stacked pancakes, cocktails, layer cakes |
When in doubt, the 45-degree angle is the safest choice because it mimics how diners actually see the food when seated at a table.
Use the Rule of Thirds
Enable the grid overlay on your phone camera (available in Settings on both iPhone and Android). Place the main dish at one of the four intersections where grid lines cross, rather than dead center. This creates a more dynamic, professional-looking composition.
Style with Intention
Adding supporting elements around the main dish creates context and visual interest:
- Ingredients as props: A few fresh herbs, a halved lemon, scattered spices, or a small bowl of sauce near the dish tells a story about the food's flavor.
- Utensils and hands: A fork twirling pasta, a hand reaching for a slice, or chopsticks lifting a dumpling adds life and movement to the frame.
- Negative space: Do not fill every inch of the frame. Leave empty space to let the eye rest and draw attention to the food itself.
- Odd numbers: Groups of three or five items tend to look more appealing than even numbers. Three tacos arranged in a slight arc looks better than four in a row.
Background Selection
The surface your food sits on sets the mood of the entire photo:
- Dark wood: Warm, rustic, and versatile. Works for almost any cuisine. A clean section of your restaurant tables may work perfectly.
- White marble or light stone: Clean, modern, and bright. Excellent for colorful dishes that pop against a light background.
- Textured concrete or slate: Moody and dramatic. Great for darker foods, cocktails, and evening-service items.
- Solid neutral surface: A simple white or gray surface focuses all attention on the food itself. Best for menu catalog photos where you want consistency across all items.
Avoid busy patterns, branded placemats, or cluttered backgrounds that compete with the food for attention.
Phone Camera Settings and Technique
A few adjustments to your phone camera settings will immediately improve your results:
Lock Focus and Exposure
Tap and hold on the food in your camera app to lock focus. On iPhone, this activates AE/AF Lock. On Android, this usually locks focus and shows an exposure slider. Adjust exposure slightly downward (darker) for richer, more saturated colors. Slightly underexposed food photos almost always look better than overexposed ones, because overexposure washes out color and texture.
Use the 2x Lens
Most modern phones have a 1x wide lens and a 2x or 3x telephoto lens. For food photography, the 2x lens (or portrait mode) is usually better because it compresses the background slightly, reducing distortion and creating a more flattering perspective. The 1x wide lens can distort plates into ovals when shooting at an angle.
Shoot in the Highest Quality
Ensure your phone is set to capture at maximum resolution. On iPhone, enable Apple ProRAW or HEIF at maximum quality. On Samsung, use the full resolution option. If your phone supports RAW capture, use it for important shots, as RAW files retain more detail for editing.
Keep It Steady
Use a tripod whenever possible. If hand-holding, brace your elbows against your body or a table edge, and take a breath before tapping the shutter. Even slight movement creates softness that ruins otherwise good photos. Most phones also have a timer function; setting a 2-second timer eliminates shake from pressing the shutter button.
Plating and Food Styling Tips
The food itself needs to look its best before you even pick up the camera. Professional food stylists spend hours on this, but a few simple techniques make a huge difference:
- Fresh garnishes last: Add herbs, microgreens, sauces, and garnishes immediately before shooting. They wilt and discolor quickly under lights.
- Wipe the plate: Use a damp cloth or paper towel to clean any drips, smudges, or fingerprints from the rim and surface of the plate before shooting. This tiny step makes a disproportionate difference.
- Glisten and shine: A light brush of olive oil on grilled meats, roasted vegetables, or pasta gives them an appetizing sheen. Mist salads with water from a spray bottle to make them look fresh and dewy.
- Height and dimension: Build dishes upward rather than flat. Stack, layer, and lean elements against each other to create visual interest and shadows.
- Color contrast: If the dish is mostly one color (say, a beige pasta), add a contrasting garnish (bright green basil, red pepper flakes, a wedge of yellow lemon) to break up the monotony.
Editing Your Photos: From Good to Professional
Even the best raw photo benefits from editing. The goal is not to make the food look fake or over-processed, but to correct white balance, boost contrast, and enhance the natural appeal of the dish.
Basic Adjustments
In any editing app (the built-in phone editor works fine for basics), adjust the following in this order:
- White balance: Correct any color cast so whites look white and the food appears true to life. If your photo looks yellow, shift the temperature cooler. If it looks blue, shift warmer.
- Exposure: Brighten or darken the overall image until the food looks naturally lit.
- Contrast: Increase slightly (+10 to +20) to make colors pop and give the image depth.
- Highlights: Decrease slightly to recover detail in bright areas (white plates, reflective sauces).
- Shadows: Increase slightly to reveal detail in darker areas without flattening the image.
- Saturation: Increase very slightly (+5 to +10). Over-saturated food looks artificial and unappetizing. Less is more here.
- Sharpness: Increase moderately to bring out texture in the food. Be careful not to over-sharpen, which creates visible halos around edges.
AI-Powered Photo Enhancement
Manual editing works, but it takes time and skill to do consistently well, especially when you need to photograph dozens of menu items. This is where AI-powered tools are transforming the game for restaurant owners.
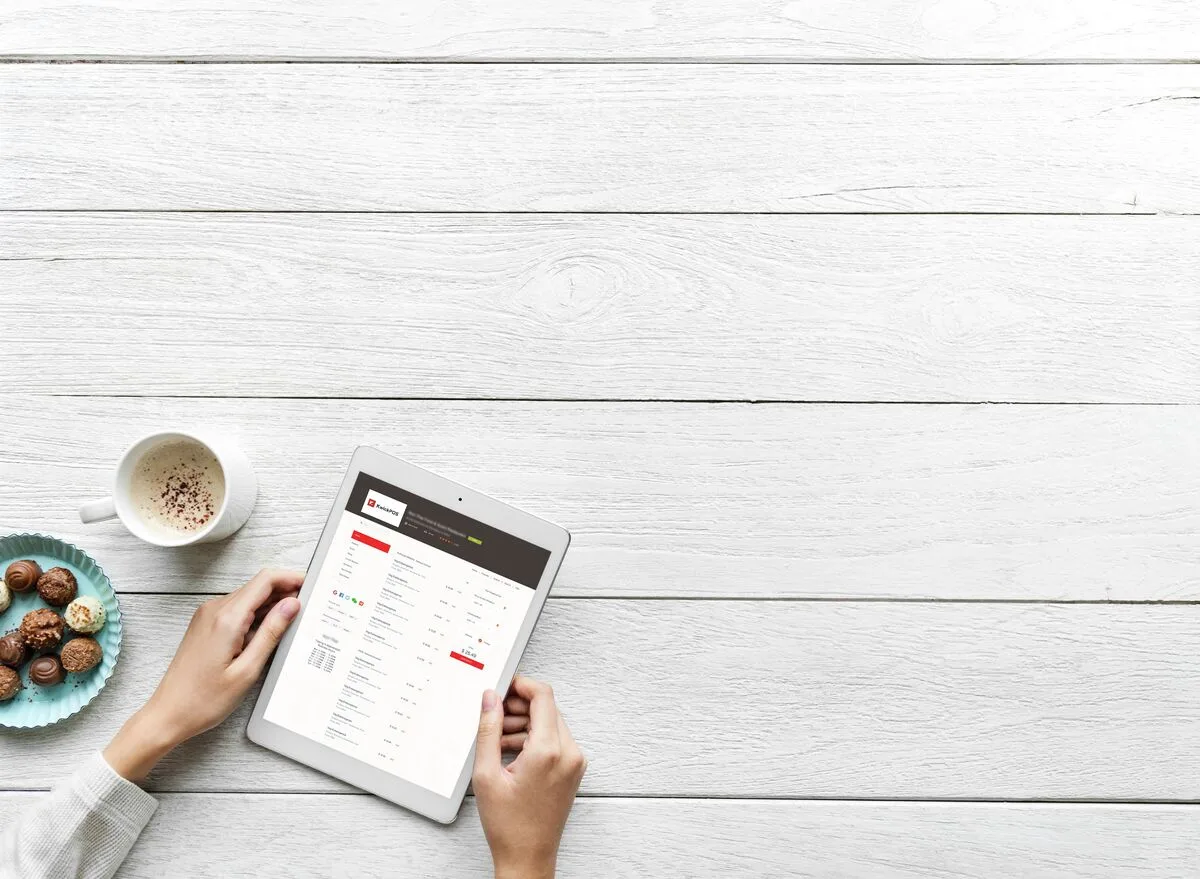
KwickPhoto, a module within the KwickOS platform, is purpose-built for exactly this use case. You take a photo of your dish with your phone, and KwickPhoto's AI automatically corrects lighting, enhances colors, removes background distractions, and applies professional-grade adjustments tuned specifically for food photography. The result is a consistent, polished look across your entire menu without needing to learn editing software or spend hours tweaking individual images.
What makes AI enhancement particularly valuable for restaurants is consistency. When you manually edit photos one by one, the results vary depending on your mood, the time you spend, and the conditions of each shot. AI applies the same professional standard to every image, so your online menu, digital signage, and social media all have a cohesive, high-quality look.
Turn Phone Photos into Professional Menu Images
KwickPhoto uses AI to automatically enhance your food photography. Snap a photo, and get a menu-ready image in seconds.
Learn About KwickPhotoOrganizing Your Restaurant Photo Library
Once you start shooting, you will accumulate hundreds of food photos quickly. A simple organizational system saves hours of searching later:
- Name by menu item: Rename files with the dish name immediately rather than leaving the default IMG_4523.jpg format.
- Create category folders: Organize by menu section (appetizers, entrees, desserts, drinks) or by use case (menu photos, social media, Google profile).
- Track versions: Keep both the original and edited versions. Label edited versions clearly so you always know which is the final version.
- Reshoot seasonally: Menu items change, plating evolves, and your photography skills improve. Schedule a reshoot of your core menu items every quarter to keep imagery fresh.
If you use an integrated restaurant platform like KwickOS, your photos can live directly within your menu management system, automatically populating your online ordering menu, digital signage displays via KwickSign, and third-party delivery platforms from a single source of truth.
Where to Use Your Food Photos
Great photos are wasted if they sit on your phone. Here are the highest-impact places to deploy your new imagery:
Online Ordering Menu
This is the number-one ROI use of food photography. Every item on your online ordering menu should have a photo. Platforms that display food images alongside menu items consistently report higher conversion rates and larger average order sizes.
Google Business Profile
Upload at least 15-20 quality food photos to your Google Business Profile. These appear in Google Search and Maps results and are often the first impression potential customers have of your restaurant.
Social Media
Post 3-5 food photos per week across Instagram, Facebook, and TikTok. Use a mix of polished menu shots and more casual behind-the-scenes content. Consistency matters more than perfection on social media.
Digital Menu Boards
If you use digital menu boards or digital signage in your restaurant, high-quality food photos displayed on screen are proven to increase impulse ordering, especially for add-ons like desserts, sides, and beverages.
Delivery Platform Listings
DoorDash, Uber Eats, and Grubhub all allow (and strongly encourage) menu item photos. Restaurants with complete photo coverage on delivery platforms see measurably higher order volumes than those without.
Common Food Photography Mistakes to Avoid
As you practice, watch out for these frequent pitfalls:
- Using the flash: The on-camera flash creates harsh, unflattering, flat light. Turn it off permanently for food photography.
- Over-editing: Heavy filters, extreme saturation, and aggressive HDR make food look artificial. Aim for natural enhancement, not Instagram-filter overload.
- Cluttered backgrounds: Other tables, kitchen equipment, or random objects in the background distract from the food. Keep backgrounds clean and simple.
- Cold food: Food photographs best when it is fresh. Congealed cheese, wilted lettuce, and melted ice cream are not appetizing. Work quickly once the dish is plated.
- Inconsistent style: Your menu photos should have a consistent look in terms of lighting direction, background, and editing style. A menu where every photo looks like it was taken in different conditions appears unprofessional.
- Ignoring the plate: The dish, plate, and garnish should all be deliberate choices. A beautiful dish on a chipped plate or a dirty table undermines the entire image.
Building a Photography Workflow for Your Restaurant
The restaurants that maintain the best food photography do not treat it as a one-time project. They build it into their operations:
- Designate a photo station: Set up a permanent area near a good window with your background surfaces, foam boards, and tripod stored and ready. When it takes 30 seconds to set up instead of 10 minutes, you will shoot more often.
- Assign a team member: Identify one person on your team who enjoys photography and give them ownership of the task. Provide the guidelines from this article and let them develop their skills.
- Shoot new items at launch: Every new menu item, special, or seasonal dish should be photographed before it hits the menu. Build this step into your menu development process.
- Batch your editing: Shoot everything in one session, then edit all photos together. This produces more consistent results and is more time-efficient than editing photos one at a time over several days.
- Automate with AI: Tools like KwickPhoto can reduce editing time from 10-15 minutes per photo to seconds, making it practical to maintain professional photography for every single menu item, not just the highlights.
Conclusion
Professional-quality food photography is no longer reserved for restaurants with big marketing budgets. With a modern smartphone, basic lighting technique, thoughtful composition, and smart editing, any restaurant owner can create images that drive online orders, social media engagement, and foot traffic.
Start with the fundamentals covered in this guide: find good light, use a foam board bounce, choose the right angle, keep backgrounds clean, and edit with restraint. As you practice, your eye will develop and the process will become second nature. And when you are ready to scale your photography across an entire menu with consistent, professional results, AI-powered tools like KwickPhoto can bridge the gap between smartphone snapshots and studio-quality imagery without the studio price tag.
Your food already tastes great. Now make it look that way, too.